Quantcast
Channel: Infragistics Community
Viewing all 2398 articles
Browse latest View live

Building Line of Business Applications using Infragistics WPF controls Webinar

$
0
0

Thank you for attending our webinar on August 23rd. I presented the NetAdvantage for WPF product briefly, showed one of the showcase applications which ship as part of the free trial, and built a simple LOB application which uses the Ribbon, DockManager, Grid, Chart and PivotGrid controls.

You can view the recording of the webinar here. You can download the slides here, and the source code of the finished application I built during the webinar here.

Please remember to unblock the ZIP archive before extracting it. The project is built using Visual Studio 2010 and .NET Framework 4. It uses the 12.1 version of the NetAdvantage for WPF product, so you can build and run it without any additional downloads. Fully-functional free 30-day trial of the NetAdvantage for WPF product, which includes all the controls I used is available.

Here’s a screenshot of the sample application:

image


If you have any questions or comments, you can reach me at kmatev@infragistics.com


Webinar Recap: jQuery Hierarchical Grid

$
0
0

I want to thank everyone again for spending time with us to learn all good things about the igHierarchicalGrid.

To get started, make sure to download a trial version of the product:

http://www.infragistics.com/products/jquery/downloads

To view all of the online samples that ship with the product (HTML & MVC) go here:

http://www.infragistics.com/products/jquery/hierarchical-grid/

Here is the link for watching the webinar again and sending to friends:

https://www149.livemeeting.com/cc/8002574606/view?id=NFFDZ3

Here is a link to the slide deck:

http://users.infragistics.com/JasonB/Infragistics%20-%20Using%20the%20igHierarchicalGrid.pdf

For all the demos and samples I showed off:

http://users.infragistics.com/JasonB/HTML-JS-Examples-Download.zip

If you have any issues, please shoot me an email at jasonb@infragistics.com.

Thanks!

Jason

Hey Dave

$
0
0

clip_image002Everybody’s talking about 3D these days. “Hey Dave, could you just put a 3D chart sample together real quick? Make sure you’ve got motion framework, tooltips, legends, markers, all that stuff. You know what I mean. Anytime this week is good.”

Hopefully, the boss wasn’t looking for much more than a proof-of-concept, but that still isn’t a request you want to be getting the week before you’re planning on taking a bit of vacation.

In the Infragistics research department we don't only prototype new stuff; sometimes we like to test the limits of what's already there. So faced with a request for a 3D chart and with the Infragistics data chart to work with, what are the options?

Well, you can think of a 2D chart as a 3D chart with the series all rotated to face the viewer and with no perspective.

In a way, the chart already is 3D: if there was just a way to change the rotation and add a bit of perspective to the series without changing anything else, then we’d be all set.

And this is the key to the whole thing. It turns out that the Projection property does exactly that. Projections were added to Silverlight way back in version 3 and allow a UIElement to be projected to give the appearance of 3D rotation and displacement. The UIElement that is projected into the scene remains fully interactive and isn’t even aware that anything “unusual” is going on.

What’s really cool is that since the data chart’s series already are UIElements, we can just set a projection on each series and we’ll get a 3D effect, automatically picking up all of the data chart’s functionality without any extra work.

3D Projections are usually implemented using a sequence of three or more 4 x 4 matrices working in a homogeneous four dimensional coordinate space. Depending on who you talk to this can all be considered hopelessly complicated or trivially simple. In any case at the price of a loss of flexibility, Silverlight’s PlaneProjection class allows us to side-step the whole question by setting just nine properties.

  1. A translation exposed by the LocalOffsetX, LocalOffsetY and LocalOffsetZ properties.
  2. A rotation represented by the CenterOfRotationX, CenterOfRotationY, CenterOfRotationZ and RotationX, RotationY and RotationZ properties.
  3. Another translation, exposed by the GlobalOffsetX, GlobalOffsetY and GlobalOffsetZ properties
  4. A fixed perspective projection back to normal 2D screen coordinates.

For me, it is easiest to think of PlaneProjection as a wrapper for a 3D scene and specific series of 3D Transforms that you can apply to a UIElement to get it to ‘project’ in 3D space.

The alternative is the MatrixProjection class which at the cost of forcing you to do all the math yourself does basically the same thing but with much finer control over the end result.

Of course, we’re not really doing “full” 3D here – we’re letting Silverlight’s Z ordering take care of depth sorting, and there won’t be any lighting or thickness to the series, but as is common to almost all 3D applications, by restricting the viewing options the illusion should be good.

Building the Sample

Now that we know basically what we’re going to do, let’s take a look at some of the details. First, an outline of the XAML (I’m just showing the layout root part, the xml namespaces are as you’d expect)

<Grid Background="#d0d0d0">
    <Grid.ColumnDefinitions>
        <ColumnDefinition Width="*"/>
        <ColumnDefinition Width="auto"/>
        <ColumnDefinition Width="auto"/>
    </Grid.ColumnDefinitions>
           
    <Grid.RowDefinitions>
        <RowDefinition Height="*"/>
        <RowDefinition Height="auto"/>
    </Grid.RowDefinitions>
           
    <ig:XamDataChart x:Name="Chart" Grid.Column="0" Grid.Row="0" Margin="4"
        BorderBrush="Black" BorderThickness="1"
        PlotAreaBackground="White"
        SizeChanged="Charts_SizeChanged">
        <ig:XamDataChart.Resources>
           …
        </ig:XamDataChart.Resources>
               
        <ig:XamDataChart.Axes>
            <ig:CategoryXAxis x:Name="XAxis" />
            <ig:NumericYAxis x:Name="YAxis" MinimumValue="0" MaximumValue="2" />
        </ig:XamDataChart.Axes>
    </ig:XamDataChart>

    <Slider x:Name="RX" Grid.Row="0" Grid.Column="1" Margin="0 4 4 4"
        Orientation="Vertical" Minimum="-80" Maximum="80"
        ValueChanged="Slider_ValueChanged"/>

    <ToggleButton Grid.Row="0" Grid.Column="2" Margin="0 4 4 4" VerticalAlignment="Top"
        Content="Update" Click="Button_Click"/>
       
    <ig:Legend x:Name="Legend" Grid.Row="0" Grid.Column="2" VerticalAlignment="Center"
        Margin="0 4 4 4"
        Background="White" BorderBrush="Black" BorderThickness="1" />

    <Slider x:Name="RY" Grid.Row="1" Grid.Column="0" Margin="4 0 4 4"
        Orientation="Horizontal" Minimum="-80" Maximum="80"
        ValueChanged="Slider_ValueChanged"/>
</Grid>

clip_image004There’s a couple of event listeners being added, and you’ll notice that since there’s nothing in the XAML, the series must be being created in page code, but for the moment at least this is just a very standard chart layout, and if you were to run this without the special 3D stuff what you’d see is very standard chart (or perhaps a 3D chart viewed face-on!)

To give this a bit of 3d pizzazz, we’re going to add a function to calculate and set the series Projection property.

Without wanting to spoil the surprise too much, if you take a look at the screen shot below, you’ll see that the series have been individually offset in z and then rotated together around their center.

To implement this we’re going to build a Projection for each series and update it whenever any of the view settings change:

private void Project()
{
    double depth = Math.Min(Chart.ActualHeight, Chart.ActualHeight);
    double localOffsetZ = 0.5 * depth;

    foreach (UIElement series in Chart.Series)
    {
        double rotationX = -RX.Value; // X Rotation slider value
        double rotationY = -RY.Value; // Y Rotation slider value

        series.Projection = new PlaneProjection()
        {
            LocalOffsetZ = localOffsetZ,
            RotationX = rotationX, RotationY = rotationY,
            GlobalOffsetZ = –depth
        };

        localOffsetZ += depth / (Chart.Series.Count - 1);
    }
}

clip_image006

We need to recalculate the projection when either of the rotations change and – since the projections also depend on the width and height of the chart and the number of series – whenever the chart size changes.

The End of the Week

Although setting Projections on the individual series wasn’t something we really thought of during the design of the data chart, the control plays so nicely with the standard Silverlight functionality that given a little lateral thinking there’s almost always going to be way to implement completely unforeseen use-cases by plugging the available bits and pieces together.

If you’re interested you can take a look at a video on you tube, or you could drop me a mail and I’ll send you the project sources. To be honest though, the whole thing’s so simple, the easiest thing would be to just copy-paste the “Project()” function straight into one of your existing projects.

I’ll work on adding lighting and proper support for axes when I get back from vacation boss.

Optimizing XamDataGrid Performance Using External Data Operations

$
0
0

A number of line of business applications use XamDataGrid for its rich feature set, high customizability and performance. If there’s been one constant development in the use of the XamDataGrid across all industries, it’s been the increasing amount of data displayed in the XamDataGrid. Traditionally, grid controls perform data operations such as sorting, filtering and grouping by themselves on the UI thread. However, with increasing data loads, developers are looking for ways to perform these operations on a separate thread, or on a different machine altogether. This is why developers have asked us to have the XamDataGrid pass the arguments of these operations, and without performing this operation, to display the processed result. We’ve added this functionality in the 12.1 release, and it has enabled us to significantly improve performance when large datasets are bound to the XamDataGrid. This blog post describes how to take advantage of this functionality, and describes its implications for performance in terms of memory footprint and time it takes to perform an operation.

Please download the sample project – it illustrates how to activate off-grid processing of data manipulations, and compares the performance of a XamDataGrid bound to the same dataset in the two cases – when internal and external operations are used. Please remember to unblock the ZIP archive before extracting it. The project is built using Visual Studio 2010 and .NET Framework 4. It uses a trial version of the 12.1 WPF product, so you can build and run it without any additional downloads. Fully-functional free 30-day trial of the NetAdvantage for WPF product, which includes the XamDataGrid is available. Here’s a screenshot of the sample project:

image

What’s in the sample

In the sample application, there are two XamDataGrids side by side - the one on the left uses internal operations, and the one on the right performs these operations through the CollectionView object instead. Both grids are bound to a dataset containing 100,000 records. In order to illustrate the difference in performance due to internal or external operations, we’ll compare the performance of sorting and grouping. However, the exact same results would also apply to filtering and summary computations.

Performance implications of using internal sort/group

By default, the XamDataGrid only creates record objects to represent the data items which are currently visible (as opposed to all the records in the dataset). However, when sort/group operations are performed by the XamDataGrid internally, it needs to create record objects to represent all the items in the data set, so it could sort/group them. Even though UI elements are not created for all these records due to the XamDataGrid UI virtualization logic, the record objects can have a substantial impact on the application’s memory footprint (as we’ll see in the performance comparison below), especially when the datasets bound to the XamDataGrid are large. So how does this impact performance? The first time a user sorts/groups a grid, there is a delay during which the XamDataGrid creates record objects for all the data items, and then performs the operation the user requested. This puts the entire dataset in memory in terms of record objects managed by the XamDataGrid. While this increases the memory footprint, and causes a delay the first time such an operation is executed, subsequent sort/group operations are quite fast, because the entire dataset is already in memory.

Let’s see how this impacts performance. Please run the sample, and sort, or group the XamDataGridon the left - you will see the time and memory footprint change (delta) reported above it. On my machine, when the internal operations grid is sorted for the first time, the operation takes 4.3 seconds and memory consumption increases by 40MB. Subsequent sorts take around 1 second, and memory footprint stays the same (since it’s already at its maximum – all data items are represented as record objects). Once the dataset is already fully loaded, grouping takes about 2.8 seconds, ungrouping 1.2 seconds.

Performance implications of using external sort/group

You can control how sorting, grouping, filtering and summary computations are performed using the SortEvaluationMode, GroupByEvaluationMode, FilterEvaluationMode and SummaryEvaluationMode properties. They give you the ability to to disable the internal sorting, grouping, filtering, and summary calculations, and to have those performed manually, or through the CollectionView object. This means that the grid doesn’t have to initialize record objects to represent the entire data set – instead, it relies on the backend to reorder the dataset. In the case of using the collection view (by setting the above properties to “UseCollectionView”), this requires no implementation of extra logic. However, if you have a backend server, where calculations/reordering are performed, you can use the Manual setting for the above properties. This will cause the XamDataGrid to fire the Sorting/Grouping/RecordFilterChanging events, enabling you to pass these onto the backend, where the calculations are performed. The XamDataGridwill display the reordered dataset once it’s been processed by the backend.

Using the UseCollectionView and Manual settings for the sorting/grouping saves the XamDataGrid the need to instantiate record objects for the entire dataset, thus keeping the memory footprint constantly low. The time component of performance is up to the backend you’re using for the processing of these operations. In this sample, in the XamDataGridon the right, we’re using the CollectionView object for handling these operations instead of the internal logic.

How about performance in this case? Please run the sample, and sort, or group the XamDataGridon the right – the time and memory footprint change will be reported right above. When sorting and grouping is performed by the collectionView (using the UseCollectionView value for SortEvaluationMode and GroupByEvaluationMode properties), the memory footprint stays the same, and the time it takes is as follows – sorting 2.5 seconds, grouping 4.9 seconds, ungrouping 2.5 seconds. There are three points to mention here:

1. The memory footprint stays constant, because no extra record objects are instantiated due to sorting/grouping

2. The time it takes to sort/group is constant, i.e. there’s no significant delay when performing the first sort/group (as is the case when internal operations are used, due to initializing record objects)

3. Time time it takes to sort/group is greater than the time it takes to perform the same operations if internal operations are used. However the time aspect of performance is entirely up to the backend you’d like to use for these operations. Even so, using the collectionView objects gives you low-memory consumption, and good first-time sort/group performance (while in the internal operations case you have an extra delay the first time an operation is performed) and may be useful in some cases.

Summary calculations

The default internal summary calculations require the grid to initialize record objects to represent the entire dataset. Using the SummaryEvaluationMode property, summary calculations can also be performed using Linq, or manually. While using Linq requires no extra implementation on your side, using the manual computation mode requires handling the QuerySummaryResultevent, where you can perform your own evaluation logic, and provide a value for the summary result. Using the manual mode enables you to keep the memory consumption low, and gives you the opportunity to improve the calculation time as much as you can by optimizing the backend.

Summary

In this blogpost, I presented how to set the XamDataGrid to perform sorting/grouping/filtering/summary calculations externally. We described the API to use for this purpose, and looked into the performance implications of using external operations. The sample project can be used to easily demonstrate the difference between the two scenarios and can be readily changed to let you see the improvement in performance you’d see when you bind your own data to it. Using manual mode, you can essentially remove any limitations on sorting/grouping/filtering/summaries imposed so far by the hardware of the client machine running your application – using a powerful calculation backend machines is the best way to process large datasets efficiently, while delivering a fast and responsive UI. You can start by talking to the users of your applications, and finding out about the views where they would benefit from larger amounts of data being displayed to help them make a decision. Once you find out about those, the XamDataGrid will help you meet the increasing hunger of your users for more data to be displayed, while delivering an excellent user experience. 

Community report: How to be authentically digital with Shane Morris

$
0
0

Shane header

At the last Melbourne XDDN meeting, Shane Morris (@ShaneMo) did a great session on “How to be authentically digital”. In it he covered off what the Microsoft Metro design language is and what the principals of it are. He gave a great insight into how the Metro design language pulled in influences from a number of design styles, such as Bauhouse and motion design.

Shane talks about how using the content itself to provide form and structure to the content can be combined with typography hierarchy. He gives examples using his own applications and shows that not all Metro designed applications need to look the same. There is a lot of room for personalisation as long as you keep the core principals in mind.

I highly recommend watching his session if you have the time.

 
https://vimeo.com/47223423

(reposted from http://davidburela.wordpress.com/2012/08/27/community-report-how-to-be-authentically-digital-with-shane-morris/)

jQuery Editors: How to get started and improve productivity and experience

$
0
0

jQuery Editors
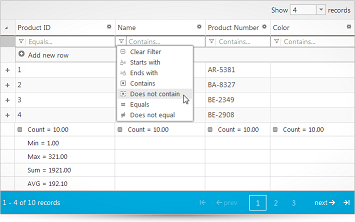
The Infragistics jQuery package comes complete with a range of editor widgets to help with one of the most common tasks  - gathering information from the user and making sure it is the one you need (validating it). Part of the product from day one – speaks just how essential they are. And in this blog and probably some more to follow  I’ll do my best to get you started and show ways to improve the editing experience and overall productivity, along with some tips and tricks. Collecting and filtering user input is one of those basic functionalities many platforms require and the jQuery version follows the path set by the type of experience provided by say ASP.NET Editors or XAML Inputs.

However, due to having both a client and server, web-based applications offer two separate points of opportunity to narrow down the unwanted input. So in such case the best place to start filtering input is on the client and the editors are ideal for that. More or less like the ASP.NET AXAJ counterpart the jQuery editors provide a similar set of controls – here’s the list:

  • Numeric editor, itself extended by:
    • Currency editor
    • Percent editor
  • Mask editor
  • Date editor
    • Date Picker
  • Text Editor


Before we dive into those, however, should be explained that all of them extend the base Editor class and use a Validator. Any extended editor can be created using the base Editor, should you need to, and any of the properties of the extended editors can be can be set within the igEditor. Of course, the whole point of the separate editors is to provide a mostly ready to use control with all the right defaults. So  further below you will see a logical representation of the editors hierarchy with short descriptions to help you figure out which one is the right for the situation.

jQuery Editors' hierarchy and descriptions

The editors’ most basic functionality is, well… to allow a text field to be edited, not surprisingly, and to provide support for additional buttons for dropdown and such. However, the actual validation that is often a huge part of the process comes courtesy of the igValidator. Yup, it’s a separate widget which means you can use it stand-alone if you will on other Input, Textarea or Select elements. The editors use those for main element and initialize validators for you, of course. In the interest of having a complete piece of information, it’s probably worth mentioning the Validator is also used by the jQuery Combo and Rating controls.

Getting started

Resources

First things first – some resources are ”required: true”, so to speak. Nothing too complicated though, but if you are not familiar with how resources can be handled your first stop should be our Deployment Guide and more specifically the page discussing how to work with JavaScript resources. The most basic resource to add are the editors themselves and the validator:

  1. $.ig.loader({
  2.     scriptPath: "http://cdn-na.infragistics.com/jquery/20121/2049/js",
  3.     cssPath: "http://cdn-na.infragistics.com/jquery/20121/2049/css",
  4.     resources: "igEditors,igValidator"
  5. });

or using the MVC helpers:

  1. @using Infragistics.Web.Mvc;
  2. @(Html.Infragistics().Loader()
  3.     .CssPath("http://cdn-na.infragistics.com/jquery/20121/2049/css")
  4.     .ScriptPath("http://cdn-na.infragistics.com/jquery/20121/2049/js")
  5.     .Resources("igEditors,igValidator").Render())

Editors

When instantiating the editors using just script you have to provide the actual markup (that being a container element or the actual input(s) to be transformed), for example:

  1. <input id="date"/>

and then you can initialize the widget like:

  1. $("#date2").igDatePicker({
  2.     inputName: 'date',
  3.     required: true,
  4.     validatorOptions: { onsubmit: true }
  5. });

or using the MVC helpers(they will create all markup for you):

  1. @(Html.Infragistics().DateTimeEditor().InputName("date")
  2. .ValidatorOptions(validate => validate.OnSubmit(true))
  3. .Required(true).Render())

Of course, you can add quite a few more tweaking to those, but for now we are going for simple.

Getting values

To get actual values when you are submitting a form(see below or one for the demos for more complete layout) we include the additional ‘Input Name’ option. This has nothing to do with naming your input, even though the actual ‘name’ attribute of inputs is used by the browser when sending form data to the server. The option instead creates an additional field like this:

  1. <input name="date" type="hidden"/>

The reason is to separate the representation (the editor’s displayed value can be different – date formats, masks, literals, etc.) from the actual value – the editor creates this field and automatically updates its value to match the editor’s and this way you get the right data on the server. And the ‘onsubmit’ validation will prevent sending the form if the editor’s value is empty!

In the demo I have two date editors and the is the action in the ‘Home’ controles handling the form submit:

  1. [HttpPost]
  2. public ActionResult Update(DateTime? date, DateTime? date2)
  3. {
  4.     /* use date and date2 here - e.g. perform additional checks
  5.        and save the input to database, etc. */
  6.     ViewBag.Message = "Entered date: " + date.ToString() +
  7.         ", and date2: "  + date2.ToString();
  8.  
  9.     //return to the same view with the new message
  10.     var path = Request.UrlReferrer.AbsolutePath;
  11.     return View(path != "/" ? path.Split('/').Last() : "Index");
  12. }

Of course, MVC does most of the value retrieval for you and some other helpful checks. One way or another this can be done on any platform!

Improve your pages’ input experience

Say you have a very common simple form for the user to fill in a few blanks. You can rely entirely on checking the result on the server but that is highly ineffective due to the completely uncontrolled user input and the additional round-trips to the server and back again. Then again as this is no new issue the HTML5 has added a whole plethora of input types to really ease that task and it’ll all be good… but none of the special features would work on IE8 or 7 and can be quite the show-stopper(not to mention the the patter to validate against in not supported at all in IE and Safari yet). So say you have the most simple form like so:

  1. form action="@Url.Action("Index")" method="post">
  2.     <fieldset>
  3.         <legend>Editorslegend>
  4.             <label>First  name:label>
  5.             <input name="name"/>
  6.             <br/>
  7.             <label>Phone: label>
  8.             <input name="phone"/>
  9.             <br/>
  10.             <label>Email: label>
  11.             <input name="email"/>
  12.             <br/>
  13.             <label>Description: label>
  14.             <br/>
  15.             <div id="descr">div>
  16.     fieldset>
  17.     <input type="submit" value="Send"> <input type="reset">
  18. form>

It doesn’t looks  or do anything special, really:

Simple HTML Inputs

By all means, add all the HTML5 types to those, just keep in mind they will all fallback to simple text inputs for non-HTML5 browsers. As it has been a practice, the only reasonable solution is to rely on script validation on the client. Of course, you have the freedom and options to use anything. You can even attach an igValidator to those fields and get awesome results… OR simply turn those inputs into proper jQuery editor widgets. And it’s really simple too:

  1. $.ig.loader(function () {
  2.     $("input[name='name']").igMaskEditor({
  3.         inputMask: ">L>LL????????????????",
  4.         validatorOptions: {}
  5.     });
  6.  
  7.     $("input[name='phone']").igMaskEditor({
  8.         inputMask: "(000)0000 999",
  9.         validatorOptions: {}
  10.     });
  11.  
  12.     $("input[name='email']").igTextEditor();
  13.  
  14.     $("#descr").igTextEditor({
  15.         textMode: "multiline",
  16.         nullText: "Leave a note."
  17.     });
  18. });

Basically you don’t need to change you markup at all in most cases (it’s  still the same HTML only swapped the description Input for a DIV so the editor can render its own main element instead). The user editing and input experience, however, is now changed drastically:

HTML inputs transformed into jQuery Editor widgets

And by adding a single line with validator options ‘ validatorOptions: {}’ (can be empty for Mask Editors as their masks define required fields) will now also display an appropriate message when input doesn’t meet requirements:

One of the validation messages the jQuery Editors show the user.

The editors become the first line of filtering out inappropriate user input – preventing it from making a travel to the server and back, when it’s guaranteed to be rejected there. Save the server some work, help reduce pointless traffic and help the user by hinting the required input with mask prompt chars and messages.

Demos and resources

  • You fiddle with two demos of your choosing:

- A JSFiddle demo, where the submit button is only good for triggering validation.

- An ASP.NET MVC project showing both delimiting in script and using the Helper as well as the from summation handling in action. Keep in mind the MVC helpers do require the Infragistics MVC assembly, see below on how to get yourself one.

As always, you can follow us on Twitter @DamyanPetev and @Infragistics and stay in touch on Facebook, Google+ and LinkedIn!

Summary

As you’ve seen above the jQuery Editors are not rocket science to use, but can truly make a difference:

  • Filter input, reduce server load/rejection rate and redundant traffic
  • Enhanced editing experience
  • User-friendly messages
  • Completely customizable
  • High control
  • Rich API
  • Stylable
  • ThemeRoller compatible

And when you consider the benefits of the being able to use the editors regardless of HTML5 support, even on older IE versions and the wonderful capability of the MVC helpers to create validation based on your model’s MVC Data Annotations – you get a whole lot of functionality with little to no effort. Stay tuned for more jQuery Editors content coming very soon.

Remote usability testing: preparing for the worst-case scenario

$
0
0

One project I’ve been working on lately has involved a remote usability testing session that accommodates all the challenging resources: multiple channels (live screen tracking + audio recording + a test guideline + few data input paper forms), multiple Lo-Fi prototypes for different user roles, fixed time for each test with limited interval in between.


It’s likely a worst-case scenario from my experience, although some tasks have already been “reserved” back toward the user interview session. After a few iterations of operation and modification, ultimately it was carried out pretty well and I’ve had sufficient data for the outcome documentation.

Here are a couple of suggestions that summarize my experience.

Strategy

The focus of the test at early stage is structure and navigation, but not detailed interaction and visual design. Therefore, only key screens need to be covered, plus avoid testing participants on performance-driven interaction tasks.

Prototype

Break down the entire application design into user-role specified prototypes for distinct group of participants. Some important and/or common tasks can be reused across all prototypes in order to still get a bigger data coverage in case it’s cut off without adequate time.

Test guideline

It’s almost a must have for participant to hold a printout test guideline in the remote usability testing as they’re expected to efficiently understand the task with sufficient information. However, we don’t want them to take advantage of the context to counteract the intuitive reaction to the given tasks. Thus, the guideline should not be passed too early but 30 minutes prior to the test session.

Test task

Think aloud protocol becomes very helpful for moderator to understand participant’s intention from mouse tracks and actions without seeing their facial expressions. Since the tooltip feature is disabled within Lo-Fi prototype, it’s better to replace all iconic buttons with text-only ones.

Announcing Coded UI Support for Windows Forms

$
0
0

I am pleased to announce that we will be shipping CodedUI Test support for major controls in the upcoming NetAdvantage for Windows Forms 12.2 release slated for early October 2012. If you are not familiar with CodedUI Tests (CUIT), here is a summary from MSDN:

Automated tests that drive your application through its user interface (UI) are known as coded UI tests (CUITs). These tests include functional testing of the UI controls. They let you verify that the whole application, including its user interface, is functioning correctly. Coded UI Tests are particularly useful where there is validation or other logic in the user interface, for example in a web page. They are also frequently used to automate an existing manual test.

What Visual Studio gives developers and testers is an easy way to record and playback tests, which can uncover bugs or regression in the UI behavior. The reason that Infragistics controls do not work ‘out of the box’ with CUIT is simple – the CUIT infrastructure in the .NET framework doesn’t know what to do when a complex control with a nested hierarchy of UI elements is being tested. So we had to do a lot of work to make sure out controls work as you would expect.

When you install Windows Forms 12.2, and you’ll see that the CUIT feature will involve two main parts:

  1. A plug-in for the CUIT Framework
  2. UI Automation (UIA) implementation for Infragistics controls

The plug-in for the CUIT Framework will be a separate assembly we provide that tells the CodedUI framework to use UIA for Infragistics controls instead of the standard and limited MSAA which is not robust enough to handle Infragistics controls. As a result of adding UIA capabilities to our controls we will be able to better support CUIT but at the same time update our Accessibility support.

The architecture looks like this:

When Does it Ship & What Do You Get?

This will ship with v12.2 in October, so we are about 1 month away from getting this into your hands. Over the last 18 months we’ve surveyed customers who have expressed interest in CUIT support, and prioritized the order of the controls we worked on and are shipping in V1 of this feature. In October you will see support for:

  • Grid
  • Combo
  • Editors (Text, Numeric, DateTime, etc)
  • Combo Editor
  • Tab (high risk)
  • Tab Strip (high risk)
  • Drop Down
  • Button
  • Scroll Bars
  • Progress Bar

Our plan is to roll out CUIT support for controls with each monthly Service Release, so you will continue to get updates until we achieve 100% coverage over the next couple of releases.  The next major controls in the roadmap are ToolbarsManager, Ribbon & DockManager.

Licensing

The licensing follows the same model as our other testing tools – if you are a tester you need a license for the Infragistics Technology Manager to record or replay tests. We are including this as part of the developer license, so a developer gets this as part of the NetAdvantage for Windows Forms product. Each Tester on your team will need a license of NetAdvantage for Windows Forms (which includes the Infragistics Technology Manager) to record and replay tests.

Wrap Up

This is a huge addition to Windows Forms, we’ve been working on this with Microsoft for well over a year now to get the right support for the rich controls in the product. If you have any questions on how this will work, the licensing, or the controls, please shoot me an email at jasonb@infragistics.com.


Poor UX and Service Designs are Out There

$
0
0

Inspite of the efforts made in establishing a working definition, Service Design is still quite difficult to define let alone convince others that it's real and that there are really poor interaction designs in the consumer service space out there. During a recent trip down South, my wife and I stopped for a meal at a nearby restaurant. The food was good and everything went well until we got handed the bill. I couldn't believe what I saw and for a moment, couldn't grasp why or how the sandwiches and glasses of water we had cost $80. After a few seconds, I realized that the problem was in the way the receipt was designed. Normally, the receipts or invoices I see emphasize on the total amount by making it either a bigger font, bolding it or both. On the contrary, this one puts the emphasis on the change and not the total -- a reverse of what is common and a confusing one at that especially since the font used for the total is extremely dwarfed by the one used for the change. To top it off, when I mentioned this issue to the manager, what I was told was that they never had complaints about it from their customers and it's just a matter of getting used to. Perhaps most of their customers are not as obsessive like me but isn't this a real enough UX issue that needs addressing?

receipt

Details for my Windows 8 MVVM talk at TechEd Australia

$
0
0

This is my first time presenting at Microsoft TechEd (long time attendee, first time speaker). I have given variations of this talk at DDD Melbourne, DDD Sydney and XDDN Melbourne and the feedback from those presentations have been great. The details of my talk are below, I hope to see in my session if you’re attending TechEd Australia!

What’s New for Windows 8 Devs Part 2
Date: Wed, 12th September
Time: 13:45-15:00
Room: Central A

Abstract: David Burela takes anyone new to Desktop development through the basics of developing for Windows 8. XAML, Databinding, DataTemplates and ViewModels will all be introduced. Discover how to separate your UI from your business logic, how to create List Views that display your data richly, how portable libraries can help your business logic be used cross platform, plus much more. The techniques will be focused on Windows 8, but can be applied to any XAML based application: WinRT, Windows Phone, WPF, Silverlight 5.

Lincoln .NET User Group–On the Road with Prism

$
0
0

Last week I traveled to Nebraska to give my “Introduction to Prism” presentation to the Lincoln .NET User Group and the Omaha .NET User Group.  My first stop was on Aug 29 at the Lincoln .NET User Group in Lincoln at the Assurity Life Insurance Headquarters.  That’s me in front of the building.

Brian Lagunas presents Intro to Prism at the Lincoln .NET User Group

The Lincoln .NET User Group is lead by my friend and community partner in crime Adam Barney.  The facilities are extremely nice and great for social events.  There is plenty of room for everyone and there’s a great little mini kitchen with everything you need for a great Prism talk.  The projector system was nice and was well equipped with everything you need.

WP_000486

WP_000484WP_000480WP_000479WP_000481

I know you’re wondering how the talk went.  The talk started out as planned.  Went through all 4 of my slides without a hitch.  Then we started building our own little prism app.  Basically the “Hello World” version of Prism.  Then as I was about to continue with the next topic of delegate commands, the group decided they wanted to just dive right in head first and take a look at a much more complicated example.  They didn’t want to see the basics.  They wanted to see Prism in action.  So the best example I had with me was the incomplete IG Outlook application I have been working on.  We talked about the application architecture, complex view composition, MVVM (Model-View-ViewModel), real world problems and real world solutions.  Well let’s just say everyone seemed to thoroughly enjoy it.

Lincoln .NET User Group attendees

I want to thank the Lincoln .NET User Group leadership for inviting me to present, Assurity for hosting the event in their wonderful facility, and everyone that took the time out of their day to come listen to me talk about Prism for 2 hours.

For those of you who attended and want the bits, look no further.

Download the Live Demo source code
Download the Prism DelegateCommand sample
Download the Prism CompositeCommand sample
Download the Prism EventAggragator sample
Download the IG Outlook sample application

Secondary and Primary user Actions

$
0
0

One quick and easy way of making any application or website more usable is to identify primary actions and secondary actions. Primary actions are the most frequently used that guide the user along an intended path to complete a task. Secondary action, while less used, offer the user ways of exiting / Modifying / restarting / Lableing /etc. a particular task. An example that all of us are familiar with are log in screens. Log in screens may consist of two text fields, one for your username and password, a log in button and (depending on the application or website) a register link,  forgot password link, cancel button, etc. In this case, can you identify the primary and secondary actions? If you said the primary action is the log in button, you would be right! The frequency in which the log in button is used is far greater than the others. It may not be something you often think about, but identifying the primary actions of the user and drawing more attention to that action can significantly improve the usability of your application.


Here is an example from Gmail (Send being the Primary Action): 

Gmail

And a few from log in screens on the Iphone:

Simple

Pocket

Login

As you can see, color, shape and opacity can all be used to differentiate primary actions from secondary. Now, go back to that application you have been working on for the past few months. Do you see primary actions that look exactly like secondary actions? Now you know what to do!

Omaha .NET User Group–On the Road with Prism

$
0
0

Last week I traveled to Nebraska to give my “Introduction to Prism” presentation to the Lincoln .NET User Group and the Omaha .NET User Group. My first stop was on Aug 29 at the Lincoln .NET User Group in Lincoln.  After my talk in Lincoln, I drove up to Omaha for the Omaha .NET User Group meeting on Aug 30 at Farm Credit Services of America.

Brian Lagunas presenting Intro to Prism at the Omaha .NET User Group

The Omaha .NET User Group is lead by Matt Ruwe.  Everyone at Farm Credit Services of America were great and very hospitable.  Even when the presenter shows up almost 2 hours early.  Hey, I like to be prepared.  The meeting room was spacious with comfortable seating.  Everyone had a view of the projector which is always a good thing.  There was nice little café style area in which you could sit in a nice booth and have your user group food and drink.

WP_000501

WP_000498WP_000499

WP_000500

The talk was awesome.  Everything went according to plan, and unlike the Lincoln .NET User Group, these guys wanted to stay with the basics and learn all the basic building blocks of prism.  Everyone was energized and asking questions.  My kind of atmosphere!  After the talk a couple of us decided to go hustle some fools out of their money with a cut-throat game of pool.

WP_000505WP_000506

Brian Lagunas shooting pool after the Omaha .NET User Group

Alright, I discovered that I really suck at pool!  I mean really bad.  Out of 6 games I won only one.  That’s only because the other guy hit the 8 ball in on accident.  Hey, a win is a win!

I want to thank the Omaha .NET User Group leadership for inviting me to present, Farm Credit Services of America for hosting the event, and everyone that took the time out of their day to come listen to me talk about Prism.

For those of you who attended and want the bits, look no further.

Download the Live Demo source code
Download the Prism DelegateCommand sample
Download the Prism CompositeCommand sample
Download the Prism EventAggragator sample
Download the IG Outlook sample application

XamRibbon–Creating a Color Gallery the MVVM Way

$
0
0

If you are a user of Infragistics NetAdvantage for WPF and have used the xamRibbon control, then chances are you have probably had the need to create a gallery of some type.  In this post I will show you how to create a gallery of colors, but instead of doing it in code behind, we will populate our gallery items from within a ViewModel.  Yes, that’s right!  We will MVVM-ify our gallery items.

First thing we need to do it create our xamRibbon with a GalleryTool.  It will be a simple view with just a ribbon, a single tab, and a single group that contains our GalleryTool.  Here is what our markup looks like:

<igRibbon:XamRibbon>
    <igRibbon:XamRibbon.ApplicationMenu>
        <igRibbon:ApplicationMenu />
    </igRibbon:XamRibbon.ApplicationMenu>
    <igRibbon:XamRibbon.QuickAccessToolbar>
        <igRibbon:QuickAccessToolbar />
    </igRibbon:XamRibbon.QuickAccessToolbar>
    <igRibbon:RibbonTabItem Header="Home">
        <igRibbon:RibbonGroup Caption="Gallery Group">
            <igRibbon:MenuTool Caption="Menu" ShouldDisplayGalleryPreview="True">
                <igRibbon:GalleryTool ItemBehavior="StateButton">
                    <igRibbon:GalleryTool.ItemSettings>
                        <igRibbon:GalleryItemSettings TextDisplayMode="Always" TextPlacement="BelowImage" />
                    </igRibbon:GalleryTool.ItemSettings>
                </igRibbon:GalleryTool>
            </igRibbon:MenuTool>
        </igRibbon:RibbonGroup>
    </igRibbon:RibbonTabItem>
</igRibbon:XamRibbon>

Let’s go ahead and create a VIewModel.

public class MainViewModel : INotifyPropertyChanged
{
    private ObservableCollection<GalleryItem> _galleryItems;
    public ObservableCollection<GalleryItem> GalleryItems
    {
        get { return _galleryItems; }
        set
        {
            _galleryItems = value;
            NotifyPropertyChanged("GalleryItems");
        }
    }

    public MainViewModel()
    {
        GalleryItems = GenerateColorGalleryItems();
    }

    /// <summary>
    /// Generates a collection of GalleryItems with all available colors.
    /// </summary>
    ObservableCollection<GalleryItem> GenerateColorGalleryItems()
    {
        ObservableCollection<GalleryItem> items = new ObservableCollection<GalleryItem>();

        PropertyInfo[] properties = typeof(Colors).GetProperties(BindingFlags.Static | BindingFlags.Public);
        foreach (PropertyInfo info in properties)
        {
            Color c = (Color)info.GetValue(typeof(Colors), null);
            ImageSource src = CreateImage(c, new Size(60, 20));
            items.Add(CreateItem(info.Name, src, c));
        }

        return items;
    }

    /// <summary>
    /// Creates a color gallery item item.
    /// </summary>
    /// <param name="caption">The caption.</param>
    /// <param name="image">The image.</param>
    /// <param name="color">The color.</param>
    /// <returns></returns>
    static GalleryItem CreateItem(string caption, ImageSource image, Color color)
    {
        GalleryItem item = new GalleryItem { Key = string.Format("Color_{0}", caption), Image = image, Text = caption, Tag = color };
        return item;
    }

    /// <summary>
    /// Creates the image for a color gallery item
    /// </summary>
    /// <param name="color">The color.</param>
    /// <param name="size">The size.</param>
    /// <returns></returns>
    static ImageSource CreateImage(Color color, Size size)
    {
        DrawingVisual v = new DrawingVisual();
        DrawingContext c = v.RenderOpen();
        c.DrawRectangle(new SolidColorBrush(color), null, new Rect(0, 0, size.Width, size.Height));
        c.Close();

        RenderTargetBitmap rtb = new RenderTargetBitmap((int)size.Width, (int)size.Height, 96, 96, PixelFormats.Pbgra32);
        rtb.Render(v);
        return rtb;
    }


    public event PropertyChangedEventHandler PropertyChanged;
    protected void NotifyPropertyChanged(string propertyName)
    {
        var handler = PropertyChanged;
        if (handler != null)
            handler(this, new PropertyChangedEventArgs(propertyName));
    }

As you can see, this ViewModel implements the INotifyPropertyChanged interface, just like all ViewModels should.  We have a property called GalleryItems which we will use to data bind our GalleryTool.Items to.  We also have a couple of methods that are responsible for creating the GalleryItems.  The CreateImage method is repsonsible for turning a Color object into a visual color block that will be displayed in the GalleryTool.

Next we need to create a binding to the GalleryTool.Items property.  Now, I know what you are going to say, “but Brian, the GalleryTool.Items property is not a DependencyProperty so you can’t data bind to it”.  That is true, but it doesn’t mean we can’t find a way around it.  You have probably seen me blog about an AttachedProperty in the past.  Well, we are going to us the same approach here in order to create a property that we can use to data bind our GalleryItems property in our ViewModel to the GalleryTool.Items property in our View.  Create a class, name it whatever you want, and then add the following AttachedProperty definition.

public class GalleryTool
{
    public static readonly DependencyProperty ItemsProperty =
        DependencyProperty.RegisterAttached("Items", typeof(ObservableCollection<GalleryItem>), typeof(GalleryTool), new UIPropertyMetadata(null, new PropertyChangedCallback(OnItemsPropertyChanged)));

    public static ObservableCollection<GalleryItem> GetItems(DependencyObject obj)
    {
        return (ObservableCollection<GalleryItem>)obj.GetValue(ItemsProperty);
    }

    public static void SetItems(DependencyObject obj, ObservableCollection<GalleryItem> value)
    {
        obj.SetValue(ItemsProperty, value);
    }

    static void OnItemsPropertyChanged(DependencyObject obj, DependencyPropertyChangedEventArgs e)
    {
        Infragistics.Windows.Ribbon.GalleryTool tool = obj as Infragistics.Windows.Ribbon.GalleryTool;
        if (tool == null)
            throw new ArgumentException("Items can only be set on a GalleryTool.");

        ObservableCollection<GalleryItem> items = e.NewValue as ObservableCollection<GalleryItem>;
        if (items != null)
        {
            tool.Items.AddRange(items);
        }
    }
}

The part that is doing the work here is the OnItemsPropertyChanged callback method that is defined in the AttachedProperty’s UIPropertyMetadata declaration.  Here we are taking the items that are being used as the source, found in the e.NewItems property of the event args, and adding them to the GalleryTool.Items property.  Once you have created this AttachedProperty yo need to add a namespace to your view and then create the binding on the GalleryTool as follows.

Namespace first:

<Window x:Class="XamRibbonColorGalleryTool.MainWindow"
        xmlns="http://schemas.microsoft.com/winfx/2006/xaml/presentation"
        xmlns:x="http://schemas.microsoft.com/winfx/2006/xaml"
        xmlns:local="clr-namespace:XamRibbonColorGalleryTool"

Now define the AttachedProperty on the GalleryTool and then set the binding to the GalleryItems from the ViewModel.

<igRibbon:MenuTool Caption="Menu" ShouldDisplayGalleryPreview="True">
    <igRibbon:GalleryTool ItemBehavior="StateButton" local:GalleryTool.Items="{Binding GalleryItems}">
        <igRibbon:GalleryTool.ItemSettings>
            <igRibbon:GalleryItemSettings TextDisplayMode="Always" TextPlacement="BelowImage" />
        </igRibbon:GalleryTool.ItemSettings>
    </igRibbon:GalleryTool>
</igRibbon:MenuTool>

If you are use to MVVM, you should know that we need to do one last step before hitting F5, and that is set the DataContext of our View to an instance of our ViewModel:

public partial class MainWindow : Window
{
    public MainWindow()
    {
        InitializeComponent();
        DataContext = new MainViewModel();
    }
}

Now you can hit F5 and run the application.  Here is what you get:

image

And when the gallery opens you can see all the wonderful colors to chose from.

image

Selection

So, there is one last thing that bugs me about the GalleryTool.  When you make a selection, the selected item does not scroll into view.  Weird, I know.  I will get that fixed in the product, but until then you can do this little trick.  First make sure you give your xamRibbon an x:Name.  Next add an event handler for the GalleryTool.ItemSelected event.

<igRibbon:GalleryTool ItemBehavior="StateButton" local:GalleryTool.Items="{Binding GalleryItems}" ItemSelected="ColorGalleryItemSelected">
    <igRibbon:GalleryTool.ItemSettings>
        <igRibbon:GalleryItemSettings TextDisplayMode="Always" TextPlacement="BelowImage" />
    </igRibbon:GalleryTool.ItemSettings>
</igRibbon:GalleryTool>

Use the following code to bring the newly selected gallery item into view:

private void ColorGalleryItemSelected(object sender, Infragistics.Windows.Ribbon.Events.GalleryItemEventArgs e)
{
    //workaround to bring the selected color into view until this is supported by the gallerytool
    Infragistics.Windows.Utilities.DependencyObjectSearchCallback<GalleryItemPresenter> callback = (presenter) => presenter.IsInPreviewArea && presenter.Item == e.Item;
    var itemPresenter = Infragistics.Windows.Utilities.GetDescendantFromType(xamRibbon1, true, callback);
    if (null != itemPresenter)
        itemPresenter.BringIntoView();
}

Now when you select a gallery item, it will be brought into view just like your customer expects.

image

Hope you enjoyed this post.  Be sure to download the source code and let me know if you have any questions.

HDC Event Follow-up: iOS Development Survival Guide for the .NET Guy

$
0
0

iOSSurvivalGuideBanner680w

I want to express a warm thank you to all the HDC attendees who came to my talk last Thursday, titled “iOS Development Survival Guide for the .NET Guy”. We had a big crowd in the room and I had a lot of fun delivering this talk. This was actually quite a milestone for me. After 16 years as a conference speaker, this was the very first time I was delivering a session that was NOT based on Microsoft technologies.

As promised during the session, you can download the slide deck and demo sample here. If you have follow-up questions or comments, feel free to post them here or ping me on Twitter at @ActiveNick. It seems there’s a lot of people in the .NET world interested in iOS development and hopefully this talk will help you get started.

For those of you that did not have a chance to see my talk, I’m happy to report that I’m already scheduled to present this session again at the Prairie DevCon in Regina, SK (October 1-3) and VSLive Orlando (December 10-14). I’m sure I’ll have a chance to present it at future events, user groups and code camps, and I’m open to invitations.


Southwest Florida .NET Code Camp Recap

$
0
0

This past weekend I had the wonderful opportunity to attend and speak at the Southwest Florida .NET Code Camp 2012 in sunny Naples, FL. It was a great event with over 80 attendees. I was there as both a speaker and a sponsor and I also brought my father and brother to the event. I’d like to thank John Dunagan again for putting on a fantastic event. I presented 3 sessions at the code camp and I wanted to take some time to provide some additional resources for those that attended the sessions.

Ig swflcc

HTML5 and jQuery Fundamentals

Originally, my boss Jason Beres was supposed to be attending this event but he needed to attend TechEd Australia instead. Since he was planning on presenting a session on HTML5 and jQuery I figured I would take that session slot and give it a try. I’m still learning HTML5 and jQuery so I’m certainly not an expert. However, I took Jason’s content and made some slides of my own and gave it a shot as a high-level overview. I thought the session went well and the attendees seemed engaged and appreciative. I promised I’d share my slides and Jason’s original material (including some content I didn’t get to talk about). Here are the links:

My slides: HTML5 & jQuery Slides.ppt
Jason’s material: Fundamentals-Webinar-Download.zip

Windows 8 Design Fundamentals

The material in this session hasn’t changed since previous events I’ve given the talk at. You can find more details on those here and here. However, one thing that is new is that I’m writing a book on the subject. Please pre-order Designing for Windows 8 today and you’ll get it when it’s done in December!

Create iOS apps using C# with Monotouch

I added this session for a bit of fun after I noticed that there weren’t any sessions at the code camp dealing with MonoTouch or Mono for Android. I think these are very important technologies and I didn’t want to let them go unrepresented. The session was at the end of the day so I kept it lighthearted with no slides and a few “Hello World”-style demos. I discussed the origins of MonoTouch and Xamarin and a little bit of the turmoil those have been through in the past. Thankfully, those things are in the past and we can safely use MonoTouch to build iOS apps without worrying about Apple interjection. I showed how to use MonoDevelop in tandem with Xcode to create a very basic application. I then showed how to build the same application using just Xcode with Objective-C.

I didn’t have slides for this session but I do have one follow-up piece of information from the session. I mentioned a service that allows you to run MonoTouch in the cloud in case you don’t feel like buying a Mac. That service is called MacInCloud and it might be a good option for you.

Summary

I had a great time at this event. I would highly recommend it to anyone next year. The location is fantastic, the facilities were very accommodating, and the people were very friendly. If you’re looking for an excuse to take a trip to Florida, this would be a good one.

SharePoint Saturday Ozarks: Event Recap

$
0
0

ozarks3372_10151173525876509_749520235_n

304671_10151173525786509_1928643678_n539084_10151173526011509_1176955861_n


Last weekend, I had the opportunity to attend and speak at the SharePoint Saturday Ozarks event in Branson, Missouri.  There’s nothing like being in the Midwest at this time of year.   Mark Rackley did a wonderful job of organizing this event.  It was held at the amazing Chateau on Lake Resort.  This was without a doubt the most beautiful SharePoint Saturday venues I’ve seen.  Infragistics was a platinum sponsor.

Many of the key SharePoint usual suspects such as Rob Windsor and my friend Tom Resing were on hand to deliver outstanding talks.


Recap:

Keynote

561581_10151173528626509_1558010641_n

Speakers

  • Former Microsoft SharePoint Product Manager - Chris Johnson
  • Microsoft SharePoint Technology Specialist - Matthew Bremer  

Perceived Message

  • Microsoft’s SharePoint cloud initiative is quite significant.
  • Moving forward, the SharePoint platform will be architected with the cloud in mind.
  • On-premise installations will slowly move into legacy land.

My Talk:  Adapting to the Mobile SharePoint Enterprise Landscape

Abstract

SharePoint continues to dominate the market as the fastest growing Microsoft platform.  As SharePoint adoption and breadth of use widens, the rate of mobile users grows.  SharePoint professionals must be prepared to handle mobility.  We will examine Buy vs. Build options.  Build options and techniques will be presented.  We’ll build a Metro-style SharePoint application to demonstrate usability and SharePoint interface usage.


Booth Demos

557289_10151173527421509_865049599_n

  • SharePlus Enterprise
  • NetAdvantage for jQuery
  • IG SharePoint Web Parts


Booth Swag

  • Modern Infragistics drawstring totes
  • *Prize* IG SharePoint Web Parts – won by Marshall Campbell

539084_10151173526011509_1176955861_n

Introduction to the jQuery Map

$
0
0

Infragistics NetAdvantage jQuery Map

Hey people ! This post , along with four more will try to shed light on the latest addition to the range of Infragistics jQuery controls – the jQuery Map. Albeit in a CTP stage , you can expect to squeeze a lot of use out of this widget. This blog post will focus on the basics of the control and how to use it in your applications and the rest of the topics will be centered on specific features.

Setting the map up

Of course , the first thing you should add to your project is add a reference to the jQuery library. You can use the CDN-hosted jQuery .js file which  you will need to put this inside your page header. In there , you should also include a jQueryUI.js reference and a Modernizr reference. Modernizr should be included in your Visual Studio project and as for jQueryUI , you can get yourself a custom build at jQueryUI.

Finally , you will also need to reference our resource loader.

With these files referenced , your header should have these lines of code:

   1: <script type="text/javascript" src="http://code.jquery.com/jquery-1.8.1.min.js"></script>
   2: <script type="text/javascript" src="Scripts/jquery-ui-1.8.11.js">
   3: <script type="text/javascript" src="Scripts/modernizr-2.0.6-development-only.js">
   4: <script type="text/javascript" src="Scripts/js/infragistics.loader.js">

Your next step would be using the resource loader to get all the map-specific files loaded up. In case you’re new to NetAdvantage 12.1 , here’s a quick run-down on using the resource loader:

   1: $.ig.loader({
   2:     scriptPath: '{Resources root}/js/',
   3:     cssPath: '{Resources root}/css/',
   4:     resources: '*' // replace the star with desired controls
   5: });
   6:  
   7: // here's an example
   8: $.ig.loader({
   9:     scriptPath: '/Scripts/js/',
  10:     cssPath: '/Content/css/',
  11:     resources: 'igMap'
  12: });

After following these steps , you have completed the setup phase and can move on to…

Rendering a map

Let’s do it baby steps – here are the bare-bones of getting a map on your web page. I will explain the important map options as well.

   1: $.ig.loader(function () {
   2:     $("#map").igMap({
   3:         width: "100%",
   4:         crosshairVisibility: "visible",
   5:         verticalZoomable: true,
   6:         horizontalZoomable: true,
   7:         overviewPlusDetailPaneVisibility: "visible",
   8:         panModifier: "control",
   9:         backgroundContent: {
  10:             type: "openStreet"
  11:         },
  12:         windowResponse: "immediate"
  13:     });
  14: });

The most important option in the lines above is the backgroundContent one – it specifies which map service do you want your widget to work with. Currently , you may choose between openStreet , bing and cloudMade. I have chosen to use OpenStreet in this example because it requires no registration – unlike Bing or CloudMade.

Another useful option is the panModifier – it establishes a key which will switch the mouse drag mode. Instead of panning the map , you will be presented with a selection-like rectangle which lets you define an area to zoom in on.

Here’s a snippet of the resulting map:

As you can see , the map is fine and dandy but it is blank. In order to add an overlay that contains some locations , we will need to explore one more option – series. Within the object scope of this option , you can provide a series of points to be plotted on the map.


Spicing it up

If you only wanted to display an empty map , then you are all set. Yet I believe most of you would want to have some data on there , so let’s get down to describing series. The simplest scenario is having a single set of locations on one map – this is illustrated in the snippet below:

   1: var europeCapitals = [
   2: { "Name": "Copenhagen", "Latitude": 55.676111, "Longitude": 12.56833 },
   3: { "Name": "London", "Latitude": 51.507222, "Longitude": -0.1275 },
   4: { "Name": "Paris", "Latitude": 48.8567, "Longitude": 2.3508 },
   5: { "Name": "Madrid", "Latitude": 40.4, "Longitude": -3.683333 }];
   6:  
   7: $.ig.loader(function () {
   8:     $("#map").igMap({
   9:         width: "100%",
  10:         crosshairVisibility: "visible",
  11:         verticalZoomable: true,
  12:         horizontalZoomable: true,
  13:         overviewPlusDetailPaneVisibility: "visible",
  14:         panModifier: "control",
  15:         backgroundContent: {
  16:             type: "openStreet"
  17:         },
  18:         series: [{
  19:             type: "geographicSymbol",
  20:             name: "capitals",
  21:             dataSource: europeCapitals,
  22:             latitudeMemberPath: "Latitude",
  23:             longitudeMemberPath: "Longitude",
  24:             markerType: "automatic",
  25:             markerBrush: "#FF0000",
  26:             markerOutline: "#00FF00"
  27:         }],
  28:         windowResponse: "immediate
  29:     });
  30: });

The code above has the locations of four different capital cities , which are fed to the map on line 21. Lines 22 and 23 define the names of which properties within your data source hold latitude and longitude information. markerType is something that would be better left off as automatic – it tells the map what types of symbols to put for every entry in the data source – valid options are circle , triangle , square , pyramid , diamond , pentagon , hexagon , tetragram , pentagram and hexagram. These come in handy when you have more extra series you wish to plot – I’ll demonstrate that in a second.

Now , here is what the code above will leave you with:

Again , this is only a snippet of the entire world map – the point was to show you that the locations we’ve described are clearly marked on their respective places. They , however , bear no information to the place they represent unless you decide to actually zoom in on them. A very simple solution to this ( for now , as there will be a blog post regarding another way of handling this issue ) is to use one of the provided events and handle clicks on the series symbols.


This last snippet will show how to include a second series to the map and how to use one of the provided events for the widget to relay information back to the user. Of course , I will try to elaborate on things right after the snippet.

   1: var europeCapitals = [
   2: { "Name": "Copenhagen", "Lat": 55.676111, "Lon": 12.56833 },
   3: { "Name": "London", "Lat": 51.507222, "Lon": -0.1275 },
   4: { "Name": "Paris", "Lat": 48.8567, "Lon": 2.3508 },
   5: { "Name": "Madrid", "Lat": 40.4, "Lon": -3.683333 }
   6: ];
   7:  
   8: var igOffices = [
   9: { "Name": "Infragistics Europe", "Country": "England", "Latitude": 51.53554, "Longitude": -0.45306 },
  10: { "Name": "Infragistics Bulgaria Development Lab", "Country": "Bulgaria", "Latitude": 42.641262, "Longitude": 23.334461 }
  11: ];
  12:  
  13: $.ig.loader(function () {
  14:     $("#map").igMap({
  15:         width: "100%",
  16:         crosshairVisibility: "visible",
  17:         verticalZoomable: true,
  18:         horizontalZoomable: true,
  19:         overviewPlusDetailPaneVisibility: "visible",
  20:         panModifier: "control",
  21:         backgroundContent: {
  22:             type: "openStreet"
  23:         },
  24:         series: [{
  25:             type: "geographicSymbol",
  26:             name: "capitals",
  27:             dataSource: europeCapitals,
  28:             latitudeMemberPath: "Lat",
  29:             longitudeMemberPath: "Lon",
  30:             markerType: "automatic",
  31:             markerBrush: "#FF0000",
  32:             markerOutline: "#00FF00"
  33:         },
  34:         {
  35:             type: "geographicSymbol",
  36:             name: "igOffices",
  37:             dataSource: igOffices,
  38:             latitudeMemberPath: "Latitude",
  39:             longitudeMemberPath: "Longitude",
  40:             markerType: "automatic",
  41:             markerBrush: "#000000",
  42:             markerOutline: "#00FFFF"
  43:         }],
  44:         windowResponse: "immediate",
  45:         seriesMouseLeftButtonUp: function (evt, ui) {
  46:             alert(ui.item.Name);
  47:         }
  48:     });
  49: });

First off , we get a second data source – the company’s office locations in Europe. Then , lines 34 to 43 describe the second series – we’ve given it a different name and a different data source , as well as different brush colors. Lines 45 to 47 describe the event handler discussed earlier. ui.item represents the series item that triggered the event , that’s why we directly display its Name attribute; other accessible properties of the ui object are ui.series , ui.positionX , ui.positionY , ui.actualItemBrush / ui.actualSeriesBrush.

Here you have it , both series displayed on the map. You can see how the control handles marker types automatically – the second series we’ve added got assigned the triangle symbol.

Finally , let’s get through something that some of you probably noticed but couldn’t figure the meaning of. Both of the series objects I have defined up there have a name property defined , which is seemingly useless – it does not show up anywhere and does not really affect the map itself in any way. This , however , lets you address the series through methods that the map widget has , such as the addItem one. Here’s a small example of how to add a new European capital to the existing series:

   1: $("#btn").click(function () {
   2:     $("#map").igMap("addItem", { "Name": "Stockholm", "Lat": 59.329444, "Lon": 18.068611 }, "capitals");
   3: });

You can also use insertItem and removeItem. These three methods automatically notify the widget that the data source has been updated.

   1: .igMap( "insertItem", item:object, index:number, targetName:string );
   2: .igMap( "removeItem", index:number, targetName:string );

And if you update your data sources in run-time ( and not using the two methods above ) , here’s how to trigger notifies that you’ve either inserted or removed an item:

   1: .igMap( "notifyInsertItem", dataSource:object, index:number, newItem:object );
   2: .igMap( "notifyRemoveItem", dataSource:object, index:number, oldItem:object );


Conclusion

I hope this introductory post has helped you grasp the basics of our Infragistics jQuery Map and has motivated you to start toying with it so you can see for yourself the amount of flexibility it offers.

View additional samples for this control here or , perhaps , download my sample project and take a look at it.

The Infragistics Tree with a Context Menu

$
0
0

Introduction


igTree simplifies the presentation of your hierarchical data into a web-based tree structure, depicting familiar parent-child relationships between nodes of information. This blog post demonstrates how to achieve custom implementation of a context menu for the igTree. Our goal is to make a context menu that appears upon user interaction with the igTree. The context menu offers choices related to the selected node – new sibling node, new child node, edit node and delete node. The screenshot bellow demonstrates the final result.


clip_image001


Before you start


Before you start you must satisfy the prerequisites for working with NetAdvantage for jQuery and in particular with the Infragistics jQuery Tree:

Requirements:

· jQuery library (version 1.4.4 or newer)

· jQuery UI (version 1.8.1 or newer)

· NetAdvantage for jQuery 2012 Vol.2


Code Snippet
  1. // Initialize Infragistics loader
  2.         $.ig.loader({
  3.             scriptPath: "http://localhost/ig_ui/js/",
  4.             cssPath: "http://localhost/ig_ui/css/",
  5.             resources: "igTree,igDialog,igEditors,igValidator"
  6.         });


Create an igTree with a Context Menu


To create an igTree with a context menu, you need to accomplish the following steps:

· Initialize the igTree

· Databind the igTree to a data source

· Implement a custom context menu for the igTree


Initialize the igTree


Before initializing the igTree you must initialize the Infragistics loader. Paths to the JavaScript and CSS files are set to point to localhost. In order to load resources for the igTree, you need to set the resources option to the string “igTree”, after that pass a function to the Infragistics loader which initializes an instance of the igTree in an HTML DIV.


Code Snippet
  1. <script type="text/javascript">
  2.     // Initialize Infragistics loader
  3.     $.ig.loader({
  4.         scriptPath: "http://localhost/ig_ui/js/",
  5.         cssPath: "http://localhost/ig_ui/css/",
  6.         resources: "igTree"
  7.     });
  8.  
  9.     $.ig.loader(function () {
  10.         // Initialize igTree
  11.         $("#tree").igTree({
  12.             ...
  13.         });
  14.     });
  15. script>


In HTML:

Code Snippet
  1.     <div id="tree"><div>


Databind the igTree to a data source


The data source which is going to be used for data binding is a JSON object. The JSON object represents a simple table of contents from the Infragistics Help.


Code Snippet
  1. // JSON object represent Table of Content from the Infragistics Help
  2.             var toc = [{
  3.                 Text: "NetAdvantage jQuery 2012.2",
  4.                 Nodes: [{
  5.                     Text: "NetAdvantage for jQuery Overview"
  6.                 }, {
  7.                     Text: "What's New",
  8.                     Nodes: [{
  9.                         Text: "What's New in 2012 Volume 2"
  10.                     }, {
  11.                         Text: "What's New Revision History"
  12.                     }, {
  13.                         Text: "Touch Support for NetAdvantage for jQuery Controls"
  14.                     }]
  15.                 }, {
  16.                         Text: "Deployment Guide",
  17.                         Nodes: [{
  18.                             Text: "Using JavaScript Resouces in NetAdvantage for jQuery"
  19.                         }, {
  20.                             Text: "JavaScript Files in NetAdvantage for jQuery"
  21.                         }, {
  22.                             Text: "Styling and Theming NetAdvantage for jQuery"
  23.                         }, {
  24.                             Text: "Infragistics Content Delivery Network (CDN) for NetAdvantage for jQuery"
  25.                         }]
  26.                 }]
  27.             }];


To successfully databind the igTree, you have to set the dataSourceType option to “json”, the dataSource to the toc variable and set the bindings options - textKey to toc’s property Text and childDataProperty to toc’s property Nodes.


Code Snippet
  1. // Initialize igTree
  2.             $("#tree").igTree({
  3.                     dataSourceType: "json",
  4.                     dataSource: toc,
  5.                     bindings: {
  6.                         textKey: "Text",
  7.                         childDataProperty: "Nodes"
  8.                     }
  9.             });


The following screenshot demonstrate the result of these steps.


clip_image002


Implement a custom context menu for the igTree


The custom context menu is going to offer commands for creating new sibling nodes, new child nodes, editing nodes and deleting nodes.

For each command an HTML DIV element is created with class name being the corresponding command (this is used later to handle commands in JavaScript).


Code Snippet
  1.     <div class="context-menu">
  2.        <div class="new-node"><span>New Sibling Nodespan>div>
  3.        <div class="new-child-node"><span>New Child Nodespan>div>
  4.        <div class="edit-node"><span>Edit Nodespan>div>
  5.        <div class="delete-node"><span>Delete Nodespan>div>
  6.     div>


And the DIVs are wrapped in another DIV with a context-menu class applied. These elements are styled with the following CSS:


Code Snippet
  1. <style type="text/css">
  2.        .context-menu
  3.        {
  4.             border:1px solid #aaa;
  5.             position:absolute;
  6.             background:#fff;    
  7.             display:none;
  8.             font-size:0.75em;
  9.         }
  10.         
  11.        .context-menu span
  12.        {
  13.             width:100px;
  14.             display:block;
  15.             padding:5px 10px;
  16.             cursor:pointer;
  17.         }
  18.         
  19.        .context-menu span:hover
  20.        {
  21.             background:#3BB7EB;
  22.             color:#fff;
  23.        }
  24.     style>


The final step is to handle the right click of a tree node. In order to do that, you have to handle the contextmenu event when right click is fired on the node anchor. You have to prevent the default behavior of the browser (which is to open the default browser context menu). To get a reference to the tree node element, you would use the igTree API. Get the closest node from igTree through the method nodeFromElement and store it. Later, this node is going to help us with the command functionality.

It is time to build the context menu and shown it to the end-user. Grab the DIV with context-menu class via jQuery and store it in a variable. Then create overlay HTML div and append it to the body.

Note:The context menu has to have a zIndex greater than the zIndex of the overlay.

You would hide the element by subscribing to the click event of the overlay DIV.


Code Snippet
  1. // Context menu
  2.             var node = "";
  3.             $("body").delegate("li[data-role=node] > a", "contextmenu", function (evt) {
  4.                 evt.preventDefault();
  5.                 
  6.                 node = $('#tree').igTree('nodeFromElement',
  7.                     $(evt.target).closest('li[data-role=node]'));
  8.                     
  9.                 var cmenu = $(".context-menu");
  10.                 
  11.                 $("
    ").
  12.                     css({
  13.                         left: "0px",
  14.                         top: "0px",
  15.                         position: "absolute",
  16.                         width: "100%",
  17.                         height: "100%",
  18.                         zIndex: "100"
  19.                     }).
  20.                     click(function() {
  21.                         $(this).remove();
  22.                         cmenu.hide();
  23.                     }).
  24.                     appendTo(document.body);
  25.                 
  26.                 cmenu.
  27.                     css({
  28.                         left: evt.pageX,
  29.                         top: evt.pageY,
  30.                         zIndex: "101"
  31.                     }).
  32.                     show();
  33.                 return false;
  34.             });


And the result after right-clicking on the “What’s New in 2012 Volume 2” node from the igTree is illustrated in the following screenshot:


clip_image001[1]


Add Functionality to the context menu commands


The context menu is now built. Next step is to implement the following commands – adding a new sibling node, adding a new child node, editing a node and deleting a node. In order to create the best end-user experience we also use other Infragistics components such as igDialog, igEditors, igButton, and igValidators.

Note: To load them in the project you need to add them in Infragistics loader option resources. Infragistics Button requires the igShared resource, but in our case it is not necessary to load, because it already loaded by the igTree.


Code Snippet
  1. // Initialize Infragistics loader
  2.         $.ig.loader({
  3.             scriptPath: "http://localhost/ig_ui/js/",
  4.             cssPath: "http://localhost/ig_ui/css/",
  5.             resources: "igTree,igDialog,igEditors,igValidator"
  6.         });


The click event is handled for each command in the context menu as follows:


Code Snippet
  1. // Add child node
  2. $("body").delegate(".context-menu .new-child-node", "click", function (evt) {
  3.     if ($(this).children().size() == 1 && node != "") {
  4.         // Add command functionality here                 
  5.     }
  6. });
 
Adding a New Sibling node


An HTML DIV element is created on the fly for the dialog window with an HTML INPUT and a BUTTON to save the new value from the input.


Code Snippet
  1. // Adding a new sibling node
  2. $("body").delegate(".context-menu .new-node", "click", function(evt) {
  3.     if( $(this).children().size() == 1 && node != "") {
  4.         // Add command functionality here
  5.         $('
    ').
  6.         appendTo("body");
  7.          
  8.     }
  9. });


The dialog window is initialized with a custom header text, custom image icon in the header and an event handler for the stateChanging event (if the action is close, dialog is destroyed and removed from DOM).


Code Snippet
  1. // Initialize igDialog
  2. $("#dialog").igDialog({
  3.     headerText: "Save new node",
  4.     imageClass: "ui-icon ui-icon-info",
  5.     width: "340px",
  6.     height: "110px",
  7.     stateChanging: function (evt, ui) {
  8.         // Check the igDialog state
  9.         if (ui.action === "close") {
  10.             $("#dialog").igDialog("destroy");
  11.             $("#dialog").remove();
  12.         }
  13.     }
  14. });


The editor is initialized with null text and required. The input is checked onblur and onchange whether it is valid.


Code Snippet
  1. // Initialize igEditor
  2. $("#newValue").igEditor({
  3.     nullText: "Enter new value",
  4.     required: true,
  5.     validatorOptions: {
  6.         onblur: true,
  7.         onchange: true,
  8.         onsubmit: true,
  9.         animationHide: 0
  10.     }
  11. });
  12.  
  13. $("#newValue").focus();


The button is initialized with the label text being “Save” and a click event handler is added. In the event handler we check whether the input is valid and if it is, a new sibling node is added via the addNode method of the igTree.

Note: To determine the parent node of a clicked node, you have to use the parentNode method of the igTree and pass the jQuery element of the clicked node.

After that the dialog is destroyed and removed from DOM.


Code Snippet
  1. // Initialize igButton
  2. $("#btnSave").igButton({
  3.     labelText: "Save",
  4.     click: function () {
  5.         if ($("#newValue").igEditor("validate")) {
  6.             $("#tree").igTree("addNode", {
  7.                 Text: $("#newValue").val()
  8.             },
  9.                 $("#tree").igTree("parentNode", node.element)
  10.             );
  11.             $("#dialog").igDialog("destroy");
  12.             $("#dialog").remove();
  13.         }
  14.     }
  15. });


The following code handles keyboard input while the editor is on focus. So, upon pressing the enter button, click is simulated on the save button.


Code Snippet
  1. // Submit on enter
  2. $("#newValue").keyup(function (event) {
  3.     if (event.keyCode == 13) {
  4.         $("#btnSave").click();
  5.     }
  6. });


Upon pressing of the escape button, the dialog is closed, destroyed and removed from DOM.


Code Snippet
  1. // Close igDialog and destroy on ESC
  2. $("#newValue").keyup(function (event) {
  3.     if (event.keyCode == 27) {
  4.         $("#dialog").igDialog("close");
  5.         $("#dialog").igDialog("destroy");
  6.         $("#dialog").remove();
  7.     }
  8. });


Finally, the context menu and overlay are hidden through this code:


Code Snippet
  1. $(".context-menu").hide();
  2.  
  3. $(".overlay").hide();


That is how you actually add the new sibling node:


Code Snippet
  1. // Add new sibling node
  2.             $("body").delegate(".context-menu .new-node", "click", function(evt) {
  3.                 if( $(this).children().size() == 1 && node != "") {                    
  4.                     $('
    ').
  5.                         appendTo("body");
  6.                     
  7.                     // Initialize igDialog    
  8.                     $("#dialog").igDialog({
  9.                         headerText: "Save sibling node",
  10.                         imageClass: "ui-icon ui-icon-info",
  11.                         width: "340px",
  12.                         height: "110px",
  13.                         stateChanging: function (evt, ui) {
  14.                             // Check the igDialog state
  15.                             if (ui.action === "close") {
  16.                                 $("#dialog").igDialog("destroy");
  17.                                 $("#dialog").remove();
  18.                             }
  19.                         }
  20.                     });
  21.                     
  22.                     // Initialize igEditor
  23.                     $("#newValue").igEditor({
  24.                         nullText: "Enter new value",
  25.                         required: true,
  26.                         validatorOptions: {
  27.                             onblur: true,
  28.                             onchange: true,
  29.                             animationHide: 0
  30.                         }
  31.                     });
  32.                     
  33.                     $("#newValue").focus();
  34.                     
  35.                     // Initialize igButton
  36.                     $("#btnSave").igButton({
  37.                         labelText: "Save",
  38.                         click: function () {
  39.                             if ($("#newValue").igEditor("validate")) {
  40.                                 $("#tree").igTree("addNode", {
  41.                                         Text: $("#newValue").val()
  42.                                     },
  43.                                     $("#tree").igTree("parentNode", node.element)
  44.                                 );
  45.                             
  46.                                 $("#dialog").igDialog("destroy");
  47.                                 $("#dialog").remove();
  48.                             }
  49.                         }
  50.                     });
  51.  
  52.                     // Submit on enter
  53.                     $("#newValue").keyup(function(event) {
  54.                         if(event.keyCode == 13){
  55.                             $("#btnSave").click();
  56.                         }
  57.                     });
  58.                     
  59.                     // Close igDialog and destroy on ESC
  60.                     $("#newValue").keyup(function(event) {
  61.                         if(event.keyCode == 27){
  62.                             $("#dialog").igDialog("close");
  63.                             $("#dialog").igDialog("destroy");
  64.                             $("#dialog").remove();
  65.                         }
  66.                     });
  67.                     
  68.                     $(".context-menu").hide();
  69.                     $(".overlay").hide();
  70.                 }
  71.             });


And the result:


clip_image003

 
Adding a New Child Node


The way a new child node is implemented is the same. The only difference is that you do not need to take the parent node of the node that has been click as in the previous command implementation. Just point to the jQuery element of the clicked node:


Code Snippet
  1. $("#tree").igTree("addNode", {
  2.     Text: $("#newValue").val()
  3. },
  4. node.element
  5. );


The following is the implementation for the new child node:


Code Snippet
  1. // Add child node
  2.             $("body").delegate(".context-menu .new-child-node", "click", function(evt) {
  3.                 if( $(this).children().size() == 1 && node != "") {
  4.                     $('
    ').
  5.                         appendTo("body");
  6.                     
  7.                     // Initialize igDialog                    
  8.                     $("#dialog").igDialog({
  9.                         headerText: "Save child node",
  10.                         imageClass: "ui-icon ui-icon-info",
  11.                         width: "340px",
  12.                         height: "110px",
  13.                         stateChanging: function (evt, ui) {
  14.                             // Check the igDialog state
  15.                             if (ui.action === "close") {
  16.                                 $("#dialog").igDialog("destroy");
  17.                                 $("#dialog").remove();
  18.                             }
  19.                         }
  20.                     });
  21.                     
  22.                     // Initialize igEditor
  23.                     $("#newValue").igEditor({
  24.                         nullText: "Enter new value",
  25.                         required: true,
  26.                         validatorOptions: {
  27.                             onblur: true,
  28.                             onchange: true,
  29.                             animationHide: 0
  30.                         }
  31.                     });
  32.                     
  33.                     $("#newValue").focus();
  34.                     
  35.                     // Initialize igButton
  36.                     $("#btnSave").igButton({
  37.                         labelText: "Save",
  38.                         click: function () {
  39.                             if ($("#newValue").igEditor("validate")) {
  40.                                 $("#tree").igTree("addNode", {
  41.                                         Text: $("#newValue").val()
  42.                                     },
  43.                                     node.element
  44.                                 );
  45.                                 
  46.                                 $("#dialog").igDialog("destroy");
  47.                                 $("#dialog").remove();
  48.                             }
  49.                         }                        
  50.                     });
  51.                     
  52.                     // Submit on enter
  53.                     $("#newValue").keyup(function(event) {
  54.                         if(event.keyCode == 13){
  55.                             $("#btnSave").click();
  56.                         }
  57.                     });
  58.                     
  59.                     // Close igDialog and destroy on ESC
  60.                     $("#newValue").keyup(function(event) {
  61.                         if(event.keyCode == 27){
  62.                             $("#dialog").igDialog("close");
  63.                             $("#dialog").igDialog("destroy");
  64.                             $("#dialog").remove();
  65.                         }
  66.                     });
  67.  
  68.                     $(".context-menu").hide();
  69.                     $(".overlay").hide();
  70.                 }
  71.             });


And the result:


clip_image004

 
Edit Node


The way node editing is implemented is identical. The only difference is that you need to update the node with the new value from the input.


Code Snippet
  1. $(node.element).
  2.                                     find("a:first").
  3.                                     text($("#newValue").
  4.                                     val()
  5.                                 );


Note:Text is changed only in the HTML on the client side.

The following is the implementation for the edit node:


Code Snippet
  1. // Edit node
  2.             $("body").delegate(".context-menu .edit-node", "click", function(evt) {
  3.                 if( $(this).children().size() == 1 && node != "") {
  4.                     // Note: Text is changed only on client side.
  5.                     // To change on the server side, you have to update data source.
  6.                     $('
    ').
  7.                         appendTo("body");
  8.                     
  9.                     // Initialize igDialog
  10.                     $("#dialog").igDialog({
  11.                         headerText: "Edit node text",
  12.                         imageClass: "ui-icon ui-icon-info",
  13.                         width: "330px",
  14.                         height: "110px",
  15.                         stateChanging: function (evt, ui) {
  16.                             // Check the igDialog state
  17.                             if (ui.action === "close") {
  18.                                 $("#dialog").igDialog("destroy");
  19.                                 $("#dialog").remove();
  20.                             }
  21.                         }
  22.                     });
  23.                     
  24.                     // Initialize igEditor
  25.                     $("#newValue").igEditor({
  26.                         value: node.element.children('a').text(),
  27.                         required: true,
  28.                         validatorOptions: {
  29.                             onblur: true,
  30.                             onchange: true,
  31.                             onsubmit: true,
  32.                             animationHide: 0
  33.                         }
  34.                     });
  35.                     
  36.                     $("#newValue").focus();
  37.                     
  38.                     // Initialize igButton
  39.                     $("#btnEdit").igButton({
  40.                         labelText: "Edit",
  41.                         click: function () {
  42.                             if ($("#newValue").igEditor("validate")) {
  43.                                 $(node.element).
  44.                                     find("a:first").
  45.                                     text($("#newValue").
  46.                                     val()
  47.                                 );
  48.                                 
  49.                                 $("#dialog").igDialog("destroy");
  50.                                 $("#dialog").remove();
  51.                             }
  52.                         }
  53.                     });
  54.                     
  55.                     // Submit on enter
  56.                     $("#newValue").keyup(function(event) {
  57.                         if(event.keyCode == 13) {
  58.                             $("#btnEdit").click();
  59.                         }
  60.                     });
  61.                     
  62.                     // Close igDialog and destroy on ESC
  63.                     $("#newValue").keyup(function(event) {
  64.                         if(event.keyCode == 27){
  65.                             $("#dialog").igDialog("close");
  66.                             $("#dialog").igDialog("destroy");
  67.                             $("#dialog").remove();
  68.                         }
  69.                     });
  70.  
  71.                     $(".context-menu").hide();
  72.                     $(".overlay").hide();
  73.                 }
  74.             });


And the result:


clip_image005

 
Delete Node


Upon deleting a run-time confirmation dialog is created and a node is created to confirm deleting of the clicked node.


Code Snippet
  1. $('

    ').
  2. appendTo("body");
  3. $("#message").html("Are you sure to delete " + node.element.children('a').text() + " permanently?");


The dialog window is implemented similarly to the previous commands.


Code Snippet
  1. // Initialize igDialog
  2. $("#dialog").igDialog({
  3.     headerText: "Delete node",
  4.     imageClass: "ui-icon ui-icon-trash",
  5.     width: "620px",
  6.     height: "150px",
  7.     stateChanging: function (evt, ui) {
  8.         // Check the igDialog state
  9.         if (ui.action === "close") {
  10.             $("#dialog").igDialog("destroy");
  11.             $("#dialog").remove();
  12.         }
  13.     }
  14. });


The button’s click event gets the node path of the clicked node and calls the removeAt method of the igTree to delete a node from the tree. After that the dialog is closed, destroyed and removed from the DOM.

Here is the code for deleting a node:


Code Snippet
  1. // Delete node
  2.             $("body").delegate(".context-menu .delete-node", "click", function(evt) {
  3.                 if( $(this).children().size() == 1 && node != "") {
  4.                     $('

    ').
  5.                         appendTo("body");
  6.                     
  7.                     $("#message").html("Are you sure to delete " + node.element.children('a').text() + " permanently?");
  8.                     
  9.                     // Initialize igDialog
  10.                     $("#dialog").igDialog({
  11.                         headerText: "Delete node",
  12.                         imageClass: "ui-icon ui-icon-trash",
  13.                         width: "620px",
  14.                         height: "150px",
  15.                         stateChanging: function (evt, ui) {
  16.                             // Check the igDialog state
  17.                             if (ui.action === "close") {
  18.                                 $("#dialog").igDialog("destroy");
  19.                                 $("#dialog").remove();
  20.                             }
  21.                         }
  22.                     });
  23.                     
  24.                     // Initialize igButton
  25.                     $("#btnOk").igButton({
  26.                         labelText: "OK",
  27.                         click: function () {
  28.                             $("#tree").igTree("removeAt", node.path);
  29.                             $("#dialog").igDialog("close");
  30.                             $("#dialog").igDialog("destroy");
  31.                             $("#dialog").remove();
  32.                         }
  33.                     });
  34.                     
  35.                     // Submit on enter
  36.                     $(document).keyup(function(event) {
  37.                         if(event.keyCode == 13){
  38.                             $("#btnOk").click();
  39.                         }
  40.                     });
  41.                     
  42.                     $(".context-menu").hide();
  43.                     $(".overlay").hide();
  44.                 }
  45.             });


And the result:


clip_image007


The sample is going to be available after 12.2 is officially released.

XamDockManager–A Prism RegionAdapter

$
0
0

Writing a generic custom Prism RegionAdapter for a complex control is sometimes difficult, because custom RegionAdapters are custom.  They normally have some specific logic built into them that make them fit into a particular application just right.  You might need a tweak here or a tweak there, need a feature here or a feature there, all depending on the requirements of the application itself. 

I have been asked numerous times about creating a RegionAdapter for the XamDockManager control that can be found in the Infragistics NetAdvantage for WPF product.  I am always hesitant to write a RegionAdapter for a complex control because I never know how the control will be used and my implementation might not fit their application needs.  Then they will think that Prism doesn’t work or the control is a piece of crap, and that I don’t know what the hell I’m doing.  I always assume they will just modify the code to make it work, but I realize that sometimes they might not understand the technology well enough to make changes.  So this blog will be my attempt to write a “generic” custom RegionAdapter for the XamDockManager control.  Because this is a “generic” region adapter, I will outline the intended functionality of this RegionAdapter.  I will explain exactly what is happening within each class to make it easier to make modifications if necessary.  If you don’t care about the WHY, then just download the source and start using it.

Functional Specs:

  1. Only intended to support a TabGroupPane as a region.  I didn’t want to make the XamDockManager itself a region because that would be too limiting.  By using the TabGroupPane, I can define multiple regions within a complex xamDockManager layout.
  2. Will not support data binding to the TabGroupPane.ItemsSource.  As with the default ItemsSourceRegionAdapter, this just causes major issues.
  3. All views injected must be of type UserControl.  I simply want to create a UserControl that has my view  elements and then inject just the UserControl.  I don’t want to have to create controls that derive from ContentPane or create ContentPanes in code.
  4. Support declaring ContentPanes in XAML and injecting views into ContentPanes.  This is helpful for when you have default views or hard coded views that are not dynamic in nature, but still need the ability to inject other views into the region.
  5. Views must be removed when closed.  The XamDockManager gives you the ability to control whether ContentPanes are completely removed from the control or just hidden from view when closed (clicking the close button).  My requirement is that when a view is closed, it will be completely removed from the region and the XamDockManager control.  So I will not honor the IRegionMemberLifetime interface which allows you to keep a view alive.
  6. Support IActiveAware.  If my View or ViewModel implements the IActiveAware interface, I want my RegionAdapter to also support this behavior.  This lets me know which View/ViewModel is the active item in my region.  This needs to be the case even if the ContentPanes are docked or floating.
  7. Have the ability to control the ContentPane.Header property.  I want my View or ViewModel to have control of what the tab header displays.

The RegionAdapter

The RegionAdapter is made up of three parts:

  1. TabGroupPaneRegionAdapter
  2. TabGroupRegionBehavior
  3. IDockAware
TabGroupPaneRegionAdapter

The TabGroupPaneRegionAdapter is the actual RegionAdapter that gets registered in the Bootstrapper of your prism application.  It’s implementation is very simple and is as follows:

public class TabGroupPaneRegionAdapter : RegionAdapterBase<TabGroupPane>
{
    public TabGroupPaneRegionAdapter(IRegionBehaviorFactory regionBehaviorFactory)
        : base(regionBehaviorFactory)
    {
    }

    protected override void Adapt(IRegion region, TabGroupPane regionTarget)
    {            
    }

    protected override void AttachBehaviors(IRegion region, TabGroupPane regionTarget)
    {
        if (!region.Behaviors.ContainsKey(TabGroupPaneRegionBehavior.BehaviorKey))
            region.Behaviors.Add(TabGroupPaneRegionBehavior.BehaviorKey, new TabGroupPaneRegionBehavior { HostControl = regionTarget });

        base.AttachBehaviors(region, regionTarget);            
    }

    protected override IRegion CreateRegion()
    {
        return new Region();
    }
}

As you can see, we are going to rely on our TabGroupRegionBehavior to manage our Region views.

TabGroupRegionBehavior

The TabGroupRegionBehavior class is doing all the heavy lifting.  Let’s look at the code, and then talk abut some of the really important parts.

public class TabGroupPaneRegionBehavior : RegionBehavior, IHostAwareRegionBehavior
{
    public const string BehaviorKey = "TabGroupPaneRegionBehavior";

    /// <summary>
    /// Used to determine what views were injected and ContentPanes were generated for
    /// </summary>
    private static readonly DependencyProperty IsGeneratedProperty = DependencyProperty.RegisterAttached("IsGenerated", typeof(bool), typeof(TabGroupPaneRegionBehavior), null);

    TabGroupPane _hostControl;
    public System.Windows.DependencyObject HostControl
    {
        get { return _hostControl; }
        set { _hostControl = value as TabGroupPane; }
    }

    protected override void OnAttach()
    {
        //if it's databound we do not allow view injection
        if (_hostControl.ItemsSource != null)
            throw new InvalidOperationException("ItemsControl's ItemsSource property is not empty. This control is being associated with a region, but the control is already bound to something else. If you did not explicitly set the control's ItemSource property, this exception may be caused by a change in the value of the inherited RegionManager attached property.");

        SynchronizeItems();

        var dockManager = XamDockManager.GetDockManager(_hostControl);
        if (dockManager != null)
            dockManager.ActivePaneChanged += DockManager_ActivePaneChanged;

        Region.Views.CollectionChanged += Views_CollectionChanged;
    }

    void DockManager_ActivePaneChanged(object sender, RoutedPropertyChangedEventArgs<ContentPane> e)
    {
        if (e.OldValue != null)
        {
            var item = e.OldValue;

            //this first checks to see if we had any default views declared in XAML and that were not injected
            if (Region.Views.Contains(item) && Region.ActiveViews.Contains(item))
            {
                Region.Deactivate(item);
            }
            else
            {
                //now check to see if we have any views that were injected
                var contentControl = item as ContentControl;
                if (contentControl != null)
                {
                    var injectedView = contentControl.Content;
                    if (Region.Views.Contains(injectedView) && Region.ActiveViews.Contains(injectedView))
                        Region.Deactivate(injectedView);
                }
            }
        }

        if (e.NewValue != null)
        {
            var item = e.NewValue;

            //this first checks to see if we had any default views declared in XAML and that were not injected
            if (Region.Views.Contains(item) && !this.Region.ActiveViews.Contains(item))
            {
                Region.Activate(item);
            }
            else
            {
                //now check to see if we have ay views that were injected
                var contentControl = item as ContentControl;
                if (contentControl != null)
                {
                    var injectedView = contentControl.Content;
                    if (Region.Views.Contains(injectedView) && !this.Region.ActiveViews.Contains(injectedView))
                        Region.Activate(injectedView);
                }
            }
        }
    }

    /// <summary>
    /// Takes all the views that were declared in XAML manually and merges them with any views that were injected into the region.
    /// </summary>
    private void SynchronizeItems()
    {
        List<object> existingItems = new List<object>();
        if (_hostControl.Items.Count > 0)
        {
            foreach (object childItem in _hostControl.Items)
            {
                existingItems.Add(childItem);
            }
        }

        foreach (object view in Region.Views)
        {
            var contentPane = PrepareContainerForItem(view);
            _hostControl.Items.Add(contentPane);
        }

        foreach (object existingItem in existingItems)
        {
            PrepareContainerForItem(existingItem);
            Region.Add(existingItem);
        }
    }

    void Views_CollectionChanged(object sender, System.Collections.Specialized.NotifyCollectionChangedEventArgs e)
    {
        //new views are being injected, so lets add them to the region
        if (e.Action == NotifyCollectionChangedAction.Add)
        {
            //we want to add them behind any previous views that may have been manually declare in XAML or injected
            int startIndex = e.NewStartingIndex;
            foreach (object newItem in e.NewItems)
            {
                ContentPane contentPane = PrepareContainerForItem(newItem);
                _hostControl.Items.Insert(startIndex++, contentPane);
            }
        }

        //We do not need to implement the NotifyCollectionChangedAction.Remove functionality becase we are setting the ContentPane.CloseAction = PaneCloseAction.RemovePane.
        //This places the responsibility of removing the item from the XamDockManager control onto the ContentPane being removed which makes our life much easier.
    }

    /// <summary>
    /// Prepares a view being injected as a ContentPane
    /// </summary>
    /// <param name="item">the view</param>
    /// <returns>The injected view as a ContentPane</returns>
    protected virtual ContentPane PrepareContainerForItem(object item)
    {
        ContentPane container = item as ContentPane;

        if (container == null)
        {
            container = new ContentPane();
            container.Content = item; //the content is the view being injected
            container.DataContext = ResolveDataContext(item); //make sure the dataContext is the same as the view. Most likely a ViewModel
            container.SetValue(IsGeneratedProperty, true); //we generated this one
            CreateDockAwareBindings(container);
        }

        container.CloseAction = PaneCloseAction.RemovePane; //make it easy on ourselves and have the pane manage removing itself from the XamDockManager
        container.Closed += Container_Closed;

        return container;
    }

    void Container_Closed(object sender, Infragistics.Windows.DockManager.Events.PaneClosedEventArgs e)
    {
        ContentPane contentPane = sender as ContentPane;
        if (contentPane != null)
        {
            contentPane.Closed -= Container_Closed; //no memory leaks

            if (Region.Views.Contains(contentPane)) //this view was delcared in XAML and not injected
                Region.Remove(contentPane);

            var item = contentPane.Content; //this view was injected and set as the content of our ContentPane
            if (item != null && Region.Views.Contains(item))
                Region.Remove(item);

            ClearContainerForItem(contentPane); //reduce memory leaks
        }
    }

    /// <summary>
    /// Checks to see if the View or the View's DataContext (Most likely a ViewModel) implements the IDockAware interface and creates the necessary data bindings.
    /// </summary>
    /// <param name="container"></param>
    void CreateDockAwareBindings(ContentPane contentPane)
    {
        Binding binding = new Binding("Header");

        var dockAwareContainer = contentPane as IDockAware;
        if (dockAwareContainer != null)
        {
            binding.Source = dockAwareContainer;
        }

        var dockAwareDataContext = contentPane.DataContext as IDockAware;
        if (dockAwareDataContext != null)
        {
            binding.Source = dockAwareDataContext;
        }

        contentPane.SetBinding(ContentPane.HeaderProperty, binding);
    }

    /// <summary>
    /// Finds the DataContext of the view.
    /// </summary>
    /// <param name="item"></param>
    /// <returns></returns>
    private object ResolveDataContext(object item)
    {
        FrameworkElement frameworkElement = item as FrameworkElement;
        return frameworkElement == null ? item : frameworkElement.DataContext;
    }

    /// <summary>
    /// Sets the Content property of a generated ContentPane to null.
    /// </summary>
    /// <param name="contentPane">The ContentPane</param>
    protected virtual void ClearContainerForItem(ContentPane contentPane)
    {
        if ((bool)contentPane.GetValue(IsGeneratedProperty))
            contentPane.Content = null;
    }
}

When this behavior is invoked on the Region, the first thing that happens is that we synchronize any views that may have been declared in XAML with any views that we are injecting.  This makes sure that our Region will know about every view that has been placed inside of it.  Even those not injected. 

During this process, we take the views being injected and create ContentPanes for them.  Why do we do this?  The TabGroupPane can only contain ContentPanes as children.  So we must create a new ContentPane for every view being injected and use that view as the Content for the ContentPane.  This is what happens in the PrepareContainerForItem method.  Notice that not only are we creating a new ContentPane and settings it’s Content property to the injected view instance, but we are also getting the DataContext of the view, which is most likely a ViewModel, and setting the DataContext of the ContentPane to be the same.  This will ensure that all our data bindings will work as expected.  We are also keeping track of if we generated the ContentPane.  Remember how we support both ContentPanes declared in XAML and views that are dynamically injected?  Well, we need to know which ones we created ContentPanes for.  The IsGeneratedPropert allows us to do this.  Now we know who created what.  We also create some data bindings which we will get to later.  The next important thing to make note of in this method is that we are adding an event handler for the Closed event of the ContentPane.  This will let us know when we need to remove the view from the region.  If you notice we set the ContentPane.CloseAction = PaneCloseAction.RemovePane.  This will basically remove the view from the XamDockManager for us so we don’t have to worry about it.

The next thing that happens is we add an event handler for the XamDockManager.ActivePaneChanged event.  This lets us know which ContentPane had been activated no matter where is has been dragged to.  In this handler we first check if the ContentPane is being deactivated (e.OldValue) or activated (e.NewValue).  The logic is very similar for both operations.  First we check to see if the Region contains the view as is.  Meaning that we are dealing with a pre-defined ContentPane most likely declared in XAML.  If it is found, then we simply deactivate/activate it.  If the Region doesn’t contain the view, then that means we are dealing with an injected view that has been wrapped in a generated ContentPane.  So we simply grab the Content of the ContentPanel, because that will be the actual injected view, and then check to see if the region contains the view.  If we find it, then we deactivate/activate it.  Pretty simple stuff.  I do want to note, that this is where the support for IActiveAware comes in.  When we activate and deactivate the view, we are invoking the IActiveAware members through the base Prism behavior.

We also add an event handler for the Regions.Views.CollectionChanged event.  This event executes when new views are added or removed from a region.  So this is where we need to add and remove views to the TabGroupPane.Items collection.  In this case we are only concerned with when new views are added.  Not removed.  Why do you ask?  Remember when we set the ContentPane.CloseAction property to PaneCloseAction.RemovePane?  Well, this is what actually handles removing the view from the TabGroupPane.Items collection.  So we don’t have to mess with it.  We only care about adding views.  So when we get a new view to add, we simply call our PrepareContainerForItem method, and add the resulting ContentPane to the TabGroup.Items collection.  Pretty simple.

The last thing to note is when we close a ContentPane.  Remember we added the event handler for the ContentPane.Closed event?  Well this is where we simply remove the view from the Region.  First we make sure to unsubscribe to the ContentPane.Closed event (no memory leaks), and then we check to see if it was a predefined ContentPane declared in XAML or a view that was injected and wrapped in a generated ContentPane.  We remove the view from the region and then clear out the Content property from the ContentPane to help eliminate any memory leaks.

IDockAware

In order to have the ability to set the Header of the tab, we need to create a data binding between a property on the View or ViewModel and the Header property of the ContentPane.  To accomplish this I have introduced an interface called IDockAware.

public interface IDockAware
{
    string Header { get; set; }
}

It has a single property appropriately called Header.  If your View or ViewModel implement this interface, the value you have set for the property will be used as the Header of the ContentPanel.  How does this work?  In the TabGroupPaneRegionBehavior.PrepareContainerForItem method, I am calling another method called CreateDockAwareBindings.  This method checks to see if the View or ViewModel implements the IDockAware interface and if it does sets a data binding between the ContentPane.Header property and the IDockAware.Header property.  This way you have complete control of the tab header and can even update it if necessary.

RegionAdapter in Action

Let’s see this baby in action.  I already have a Prism application with a single module and a single view ready for testing.  The first thing we need to do is register our RegionAdapter in the Bootstrapper.

protected override Microsoft.Practices.Prism.Regions.RegionAdapterMappings ConfigureRegionAdapterMappings()
{
    RegionAdapterMappings mappings = base.ConfigureRegionAdapterMappings();
    mappings.RegisterMapping(typeof(TabGroupPane), Container.Resolve<TabGroupPaneRegionAdapter>());
    return mappings;
}

Next, I have a Shell with some regions defined on a couple of TabGroupPanes.

<Grid>
    <igWPF:XamDockManager>
        <igWPF:XamDockManager.Panes>
            <igWPF:SplitPane SplitterOrientation="Horizontal" igWPF:XamDockManager.InitialLocation="DockedLeft">
                <igWPF:TabGroupPane prism:RegionManager.RegionName="TabGroupPaneTwo" />
            </igWPF:SplitPane>
        </igWPF:XamDockManager.Panes>
        <igWPF:DocumentContentHost>
            <igWPF:SplitPane>
                <igWPF:TabGroupPane prism:RegionManager.RegionName="TabGroupPaneOne">
                    <igWPF:ContentPane TabHeader="Default 1">
                        <TextBlock Text="Content" />
                    </igWPF:ContentPane>
                    <igWPF:ContentPane TabHeader="Default 2">
                        <TextBlock Text="Content" />
                    </igWPF:ContentPane>
                </igWPF:TabGroupPane>
            </igWPF:SplitPane>
        </igWPF:DocumentContentHost>
    </igWPF:XamDockManager>
</Grid>

As you can see I have even added a couple of “default” ContentPanes declaratively in XAML.  In my Module I am simply injecting a few instances of my view into the two regions.  Nothing special here so I won’t take up space with a code snippet.  What I do want to share with you is the ViewModel that the view is using as it’s DataContext.

public class ViewAViewModel : INotifyPropertyChanged, IActiveAware, IDockAware
{
    public ViewAViewModel()
    {
        Number = DateTime.Now.Millisecond;
        Header = String.Format("Title: {0}", Number);
    }

    public int Number { get; set; }

    #region IActiveAware

    bool _isActive;
    public bool IsActive
    {
        get { return _isActive; }
        set
        {
            _isActive = value;
            NotifyPropertyChanged("IsActive");
        }
    }

    public event EventHandler IsActiveChanged;

    #endregion //IActiveAware

    #region IDockAware

    private string _header;
    public string Header
    {
        get { return _header; }
        set
        {
            _header = value;
            NotifyPropertyChanged("Header");
        }
    }

    #endregion //IDockAware

    #region INotifyPropertyChanged

    public event PropertyChangedEventHandler PropertyChanged;
    protected void NotifyPropertyChanged(string propertyName)
    {
        var handler = PropertyChanged;
        if (handler != null)
            handler(this, new PropertyChangedEventArgs(propertyName));
    }

    #endregion //INotifyPropertyChanged
}

As you can see, this ViewModel implements the standard INotifyPropertyChanged, but it also implements two more interfaces.  It implements Prism’s IActiveAware interface so I will always know which View/ViewModel is the active View/ViewModel.  It also implements our newly created IDockAware interface, so I can set the Header of the View’s ContentPane.  This is the result of the running application.

image

As you can see, I have multiple instances of my View injected into the various Regions.  The ViewModel is properly setting the header property of the tabs, and I know which View is the active view as I change tabs or start docking and undocking tabs.

image

That just about wraps it up.  Go ahead and download the source and start having some Prism fun.  If something doesn’t fit your needs, feel free to change it so that it does.  If you have any questions feel free to contact me through my blog, on twitter (@BrianLagunas), or leave a comment below.

Viewing all 2398 articles
Browse latest View live